


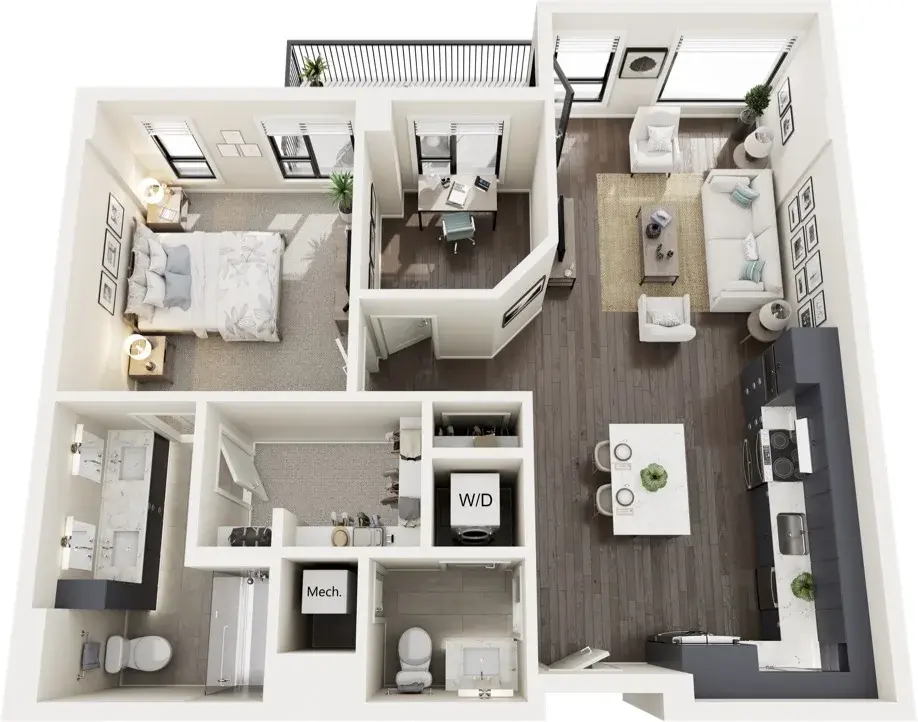
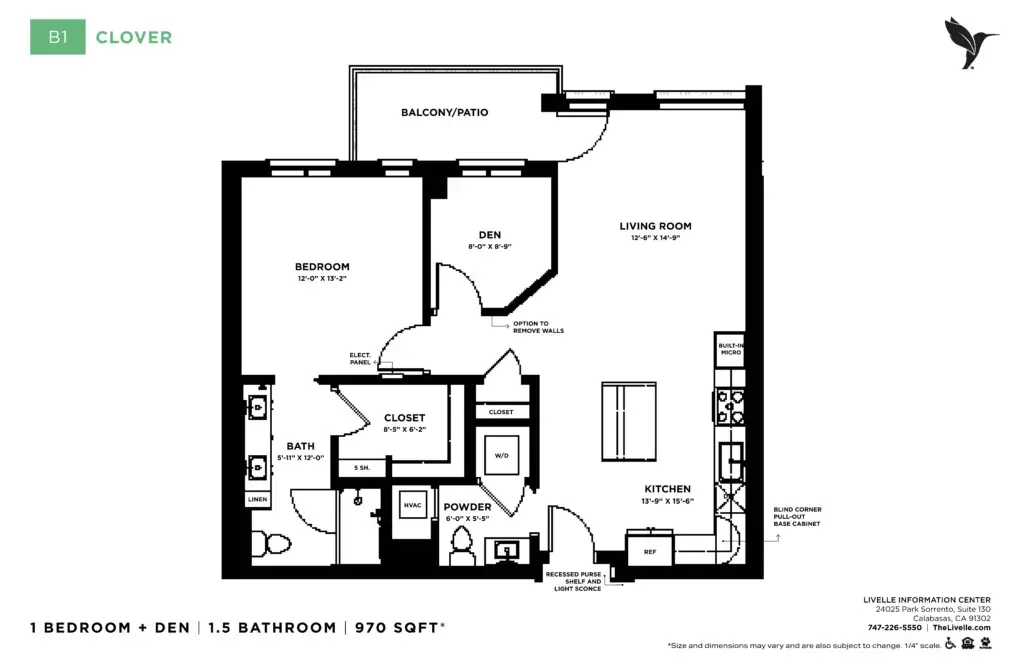
Test-Clover
1 bedroom + den | 1.5 bathrooms
750 sq. ft. | Apartment

Content Editor Guide
All examples use The Delaney at Georgetown Village (Georgetown, TX), the first real community microsite.
Recommended best practice: instead of building a site from scratch, duplicate an existing sample microsite. This copies over the complete structure of pages, navigation headers, footers, and form sections, so you only need to update the branding and content for the new community.
Steps
⚠️ Communities is shared with the main site. The microsite uses the Default Communities provider, so it works with the same Community items as the live main site. Any change you make to the Community item is published on the main site as well. Edit the Community item carefully, and only change what is correct for both sites.
⚠️ The site must stay "in process of development" until go-live. The real domain can be set from the start. It does nothing on its own while the Community's Has microsite checkbox is unchecked: the main site keeps serving the community's detail page. Do not check Has microsite at this stage.
Go to Design → Page Templates and open [Community name] Base Template for editing.
On any page containing a form (such as the Contact Us page):
Go through every page of the new site and replace the sample content (texts, images, galleries, testimonials, floor plans, links) with content for the new community. Publish each page when done.
This can be done during development, so the community editor can help fill in the content. It ensures a community editor only has access to their specific microsite and cannot view or edit other sites in the project.
Open the microsite on its testing domain and check:
Why this is the last step: once this checkbox is checked, the main site no longer resolves the community's default detail page, and all links across the main site and the Community Finder point visitors to the microsite. Checking it before the microsite is ready breaks the live community page.
Rollback: if something is wrong after go-live, uncheck Has microsite on the Community and Publish, then check This site is in process of development on the microsite again. The main site's detail page will serve the community again.
Add a Hero element from the Content section on the page and click Edit.
Choose Hero image ViewName.
THE SPINU AT CEDAR FALLS
Add a Hero element from the Content section on the page and click Edit.
Choose Hero image ViewName.
1. Add Hero widget and select HeroImageLeft template.
2. Fill in Title Black, Title Size, Description, Image (Background Image)
Add a CustomSection element from the Layout section on the page and click Edit.
Choose Card link simple section ViewName.
Add a Card link simple element from the Content section in the Card link simple section, click Edit and populate the Button Link fields.
Add a CustomSection element from the Layout section on the page and click Edit.
Choose Grey Section ViewName.
Add a Card contacts element from the Content section in the Grey Section, click Edit and populate the Title Black, Description and Footnote fields.
Add a CustomSection element from the Layout section on the page and click Edit.
Choose Grey section wider ViewName.
Add a Card logo text element from the Content section in the Grey section wider, click Edit and populate the Image and Description fields.

With multiple floor plan options for every level of care, The SpinU Cedar Falls gives you the opportunity to choose just the right one to suit your needs. Because, when you find the layout you love and make it feel like home, that's when you can truly be you.
Add a Card image left/right element from the Content section , click Edit and populate the needed fields.
Select View Template: In widget properties under Template, choose either: CardImageRight – Image positioned on the right, content/text on the left. CardImageLeft – Image positioned on the left, content/text on the right.
Configure Content Properties:
Eyebrow: Subtitle text above the main headline .
Title Black: Primary headline text in dark font color
Title Size: Heading tag size (H1, H2, H3, H4, H5).
Description
Image
Button Link: Primary interactive bounce button (bounce-container / bounce-button-link with dynamic arrow icon).
Button Link Second: Secondary inline arrow link (inline-arrow).
Accordion Items: Optional collapsible accordion items
Embed String: Optional raw embed HTML/script field.
Layout Settings (Background & Text Alignment):
Background (Chip choice dropdown):
CommunityPrimaryColor (Microsite Only): Applies the community's primary brand background
CommunitySecondaryColor (Microsite Only): Applies the community's secondary brand background
Light: Clean, solid white background
Grey: Soft, neutral light-gray background
Overlay: Injects the responsive background vector overlay
THE SPINU AT CEDAR FALLS
At The SpinU, you live the life you want to live. You'll stay connected to the Richmond and Katy area and be close to the ones you love, while at the same time enjoying all the advantages of residing in a friendly and welcoming senior living community that nourishes your well-being and supports the interests and passions that bring meaning to your life.
This is a place where you can truly be you. Your very best you.
Our LifeSTYLE Promise®—The SpinU commitment to giving you choice, flexibility, and control over everything you do—guarantees it. And our senior Health and Wellness Navigation team will ensure that you have everything you need—both now and when medical challenges may arise—to live your very best life.
Add a CustomSection widget using the CardWhiteBackgroundSection template.
Add card widget and select CardImageFootnote template.
#1 in Customer Satisfaction among Independent Living Senior Living Communities, 7 years in a row.
Visit jdpower.com/awards for more information.

Add a CustomSection widget using the CardsIcoSmSection template, then place the following Card widgets inside:
CardTitleTextOnly in the top for the section title.
CardIcoSmWhite in the middle for the white cards.
CardImageFootnote in the bottom area .
#1 in Customer Satisfaction among Independent Living Senior Living Communities, 6 years in a row.
Visit jdpower.com/awards for more information.
Life Care Services has won more independent living awards than any other brand in the J.D. Power U.S. Senior Living Satisfaction Studies from 2019-2024.
Add a CustomSection widget using the CardsIcoSmSection template, then place the following Card widgets inside:
CardTitleTextOnly in the top for the section title.
CardIcoSmWhite in the middle for the white cards.
CardImageFootnote in the bottom area .
List.MediaGallery.Default - Full slider with built-in primary theme background (main microsite color),
List.MediaGallery.WhiteBackground - Full slider with built-in white background
List.MediaGallery.GreyBackground - Full slider with built-in light gray background
List.MediaGallery.Default.TitleSimple - Image-only slider with default primary theme background
List.MediaGallery.WhiteBackground.TitleSimple – Image-only slider with White background.
List.MediaGallery.GrayBackground.TitleSimple – Image-only slider with Light gray background.
List.MediaGallery.Default.TitleSimple
Assembly Instructions ( for TitleSimple templates )
LCS offers a full suite of business solutions for senior living providers across the nation - management, development, real estate, and group purchasing.
LCS offers a full suite of business solutions for senior living providers across the nation - management, development, real estate, and group purchasing.
LCS offers a full suite of business solutions for senior living providers across the nation - management, development, real estate, and group purchasing.
Take a look below at just a sample of our beautifully designed one- and two-bedroom independent living floor plans. Please contact us to schedule a visit to view any of our other eight floor plan options. You're sure to find one that's perfect for you. And, yes, The Delaney is pet friendly! Every floor plan features:
Take a look below at just a sample of our beautifully designed one- and two-bedroom independent living floor plans. Please contact us to schedule a visit to view any of our other eight floor plan options. You're sure to find one that's perfect for you. And, yes, The Delaney is pet friendly! Every floor plan features:
Take a look below at just a sample of our beautifully designed one- and two-bedroom independent living floor plans. Please contact us to schedule a visit to view any of our other eight floor plan options. You're sure to find one that's perfect for you. And, yes, The Delaney is pet friendly! Every floor plan features:
Add ContentList widget (configured for Articles)
and select template List.Articles.
Assisted living is an excellent choice for older adults who want to maintain independence but could use some help with daily routines and personal care. But the question on everyone’s minds—how much will assisted living cost—is what causes many people to rule out this helpful care option.
Still, the cost question is a big one, and the answer depends on a few key factors—like the location of the community, the level of care needed, and the amenities offered. Here, we’ll break down what’s included in assisted living at The Delaney Senior Living, what things might cost extra, and how to plan financially for this next stage of life.
According to the 2023 Genworth Cost of Care Survey, assisted living costs, on average, about $4,800 per month. However, that number can range between $3,200 and $6,500 or more, depending on a few factors:
Location: Costs in metropolitan areas are typically higher than in rural settings. Also, monthly costs can vary greatly by state of residence.
Apartment size: Studio apartments tend to be more affordable than one- or two-bedroom options.
Amenities: Extra luxuries such as private dining, salon services, or fitness studios can increase monthly rates.
Care level: The more personal assistance or medical oversight required, the higher the cost.
For instance, someone who only needs help with light grooming and medication reminders will likely pay less than someone requiring hands-on care several times a day.
Assisted living communities are designed to provide comfort, safety, and support—without sacrificing independence. Most offer a blend of housing, meals, personal care, and social opportunities. The goal is to ensure residents receive the right level of assistance with Activities of Daily Living (ADLs) and Instrumental Activities of Daily Living (IADLs).
Activities of Daily Living (ADLs) include:
Bathing and personal hygiene support
Dressing and grooming support
Assistance with eating
Toileting support
Mobility and transferring assistance
Instrumental Activities of Daily Living (IADLs) include:
Medication reminders
Light meal preparation or special dietary needs
Housekeeping and laundry
Transportation for errands and appointments
Help with scheduling medical visits
Beyond these essentials, most assisted living communities also include:
Private, spacious apartments
Daily meals and snacks
Life enrichment and wellness programs
Scheduled transportation
24/7 staff with extensive training
Emergency response systems
These core services are typically bundled into the base monthly rate, though offerings may vary slightly from one community to another.
While many services are built into the base monthly rate, certain features or specialized care options may be offered at an additional cost. Always ask for a detailed fee schedule during your visit to ensure full transparency and an understanding of what’s provided.
Common add-on costs may include:
Diabetes management and insulin administration
Physical or occupational therapy (via third-party providers)
Extra personal care support
Salon or spa treatments
Incontinence supplies and care
Private transportation or medical escort services
Cable, Wi-Fi, and telephone service upgrades
Some communities offer tiered plans or a points-based model that adjusts pricing based on individual needs and care levels.
Navigating financial decisions around these high assisted living costs is complicated—and that makes it feel overwhelming (understandable!). The good news? There are several ways to pay:
Private Pay: Most residents use personal resources such as retirement funds, pensions or investments, or Social Security benefits.
Long-Term Care Insurance: If you have a long-term care insurance policy, review it carefully—many cover some or all costs associated with assisted living.
Veterans Benefits: Veterans and surviving spouses may qualify for the VA Aid & Attendance benefit, which helps offset assisted living expenses.
Home Sale or Reverse Mortgage: Selling a home or using home equity can help generate funds to cover monthly care costs.
Medicaid (in limited states): Medicaid coverage for assisted living varies by state. Some states offer waiver programs that help pay for personal care costs within licensed assisted living communities.
Assisted living might be the right fit if someone:
Needs support with personal care, meals, or medications
Feels isolated or unsafe living alone
Is ready for more social opportunities and community engagement
Finds managing a household increasingly difficult
Assisted living bridges the gap between independent living and skilled nursing, offering the perfect blend of freedom and support. Many residents find comfort knowing care can be adjusted as their needs evolve.
If you’re beginning to explore assisted living options, The Delaney Senior Living offers a distinctive experience that feels more like home than healthcare. With beautiful residences, engaging programs, and compassionate, personalized care, our communities are designed to support every aspect of well-being—mind, body, and spirit.
Understanding the costs and benefits of assisted living is the first step toward making a confident and informed decision. Want to learn more about life at our communities? Let’s start the conversation today.
Add a CustomSection widget and select template Carousel section.
Add Card title button in the Carousel section.
Add Card title button in the Carousel section.
Configure properties:
Title Black: Primary title line.
Button Link - View All.
Add ContentList widget (configured for Articles)
and select template List.Articles.Carousel.
Assisted living is an excellent choice for older adults who want to maintain independence but could use some help with daily routines and personal care. But the question on everyone’s minds—how much will assisted living cost—is what causes many people to rule out this helpful care option.
Still, the cost question is a big one, and the answer depends on a few key factors—like the location of the community, the level of care needed, and the amenities offered. Here, we’ll break down what’s included in assisted living at The Delaney Senior Living, what things might cost extra, and how to plan financially for this next stage of life.
According to the 2023 Genworth Cost of Care Survey, assisted living costs, on average, about $4,800 per month. However, that number can range between $3,200 and $6,500 or more, depending on a few factors:
Location: Costs in metropolitan areas are typically higher than in rural settings. Also, monthly costs can vary greatly by state of residence.
Apartment size: Studio apartments tend to be more affordable than one- or two-bedroom options.
Amenities: Extra luxuries such as private dining, salon services, or fitness studios can increase monthly rates.
Care level: The more personal assistance or medical oversight required, the higher the cost.
For instance, someone who only needs help with light grooming and medication reminders will likely pay less than someone requiring hands-on care several times a day.
Assisted living communities are designed to provide comfort, safety, and support—without sacrificing independence. Most offer a blend of housing, meals, personal care, and social opportunities. The goal is to ensure residents receive the right level of assistance with Activities of Daily Living (ADLs) and Instrumental Activities of Daily Living (IADLs).
Activities of Daily Living (ADLs) include:
Bathing and personal hygiene support
Dressing and grooming support
Assistance with eating
Toileting support
Mobility and transferring assistance
Instrumental Activities of Daily Living (IADLs) include:
Medication reminders
Light meal preparation or special dietary needs
Housekeeping and laundry
Transportation for errands and appointments
Help with scheduling medical visits
Beyond these essentials, most assisted living communities also include:
Private, spacious apartments
Daily meals and snacks
Life enrichment and wellness programs
Scheduled transportation
24/7 staff with extensive training
Emergency response systems
These core services are typically bundled into the base monthly rate, though offerings may vary slightly from one community to another.
While many services are built into the base monthly rate, certain features or specialized care options may be offered at an additional cost. Always ask for a detailed fee schedule during your visit to ensure full transparency and an understanding of what’s provided.
Common add-on costs may include:
Diabetes management and insulin administration
Physical or occupational therapy (via third-party providers)
Extra personal care support
Salon or spa treatments
Incontinence supplies and care
Private transportation or medical escort services
Cable, Wi-Fi, and telephone service upgrades
Some communities offer tiered plans or a points-based model that adjusts pricing based on individual needs and care levels.
Navigating financial decisions around these high assisted living costs is complicated—and that makes it feel overwhelming (understandable!). The good news? There are several ways to pay:
Private Pay: Most residents use personal resources such as retirement funds, pensions or investments, or Social Security benefits.
Long-Term Care Insurance: If you have a long-term care insurance policy, review it carefully—many cover some or all costs associated with assisted living.
Veterans Benefits: Veterans and surviving spouses may qualify for the VA Aid & Attendance benefit, which helps offset assisted living expenses.
Home Sale or Reverse Mortgage: Selling a home or using home equity can help generate funds to cover monthly care costs.
Medicaid (in limited states): Medicaid coverage for assisted living varies by state. Some states offer waiver programs that help pay for personal care costs within licensed assisted living communities.
Assisted living might be the right fit if someone:
Needs support with personal care, meals, or medications
Feels isolated or unsafe living alone
Is ready for more social opportunities and community engagement
Finds managing a household increasingly difficult
Assisted living bridges the gap between independent living and skilled nursing, offering the perfect blend of freedom and support. Many residents find comfort knowing care can be adjusted as their needs evolve.
If you’re beginning to explore assisted living options, The Delaney Senior Living offers a distinctive experience that feels more like home than healthcare. With beautiful residences, engaging programs, and compassionate, personalized care, our communities are designed to support every aspect of well-being—mind, body, and spirit.
Understanding the costs and benefits of assisted living is the first step toward making a confident and informed decision. Want to learn more about life at our communities? Let’s start the conversation today.
1. Add Card widget and select CardImageLeft template.
2. Fill in Title Black, Title Size, Description, Image, Image Outer, Button Link, Background
1. Add Section Container:
- Add CustomSection widget.
- Select template: CardFormSection.
2. Configure Left Column (Content & Image):
- In the left zone (Widgets section left), add a Card widget.
- Select template: CardVerticalAligned.
- In ContainerWhiteText add a Card widget with template CardTitleTextOnly.
Fill in:
Title Black
Description
Image
3. Configure Right Column (White Form Box):
- In the right zone (Widgets section right), drag and drop a CustomSection widget.
- Select template: ContainerWhiteSectionInner.
Inside the ContainerWhiteSectionInner add the Form widget.
Select the desired form.
At The SpinU, you live the life you want to live. You'll stay connected to the Richmond and Katy area and be close to the ones you love, while at the same time enjoying all the advantages of residing in a friendly and welcoming senior living community that nourishes your well-being and supports the interests and passions that bring meaning to your life.
This is a place where you can truly be you. Your very best you.
Our LifeSTYLE Promise®—The SpinU commitment to giving you choice, flexibility, and control over everything you do—guarantees it. And our senior Health and Wellness Navigation team will ensure that you have everything you need—both now and when medical challenges may arise—to live your very best life.
1. Add Outer Section:
- Add CustomSection widget.
- Select template: SideBySideSection.
2. Add Heading:
- Inside the SideBySideSection section, add CustomSection widget.
- Select template: ContainerWhiteText.
- In ContainerWhiteText add a Card widget with template CardTitleTextOnly.
Fill in:
Title Black: Contact Us
Title Size: H2
3. Add Form Box:
- Below the heading (inside the outer section), add CustomSection widget.
- Select template: ContainerWhiteSection.
4. Add Form:
- Inside the ContainerWhiteSection add the Form widget.
- Select the desired form.
Section-fp.CardHorizontal. Fill in TitleBlack (first line), TitleGradient (second line), Title Size H2, and Description (the intro text).
Picture yourself in a space designed for the way you live. Explore our sample floor plans in 3D, or switch to 2D for a closer look at each layout.
Add a Content list and select Testimonials content type.
Templates:
List.Testimonials.Default - (main microsite color)
List.Testimonials.GreyBackground
List.Testimonials.LightBackground
List.Testimonials.WhiteBackground
